The QuickBooks Condense Data utility allows you to reduce file size when it exceeds a threshold that could affect normal QBDT operations. It helps you to delete and condense the transactions that are closed or old. Moreover, it can help you import the company file to Online from the Desktop version of QB. A lot of users have experienced these issues with the file size under 150 mb for QB Pro and Premier versions, whereas 1.5 GB for the Enterprise version.
If you need help with your company file, contact our experts to get a free consultation.
Table of Contents
Factors to Consider Before You Condense QuickBooks Data File
In this section, we will talk about some of the crucial aspects to consider before you begin to condense the company file in QBDT.
- It is an irreversible process: The process of condensing the company file is a process you can’t go back from. The following are some of the scenarios where you can consider running the condense utility.
- Your company file is too large in size.
- You are about to exhaust the list limit.
- If you have recently upgraded your system’s hardware.
- You have already discussed the matter with them and your accountant, and they suggest you proceed with data condensing.
- Company file sizes are unchanged: If you compress the file to reduce the size, you might end up in one of the following situations:
- The condensed data utility reduces file size by removing transaction details and list entries, which typically contain little data.
- If you have any open transactions, they won’t be consolidated, so the file size won’t be affected.
- You cannot compress the data file if there is little to compress.
- Condensing the data file does not always repair the data. If you have already compressed the data and still face the error, the following can be done.
- Utilise the verify and rebuild tool to fix the data damage.
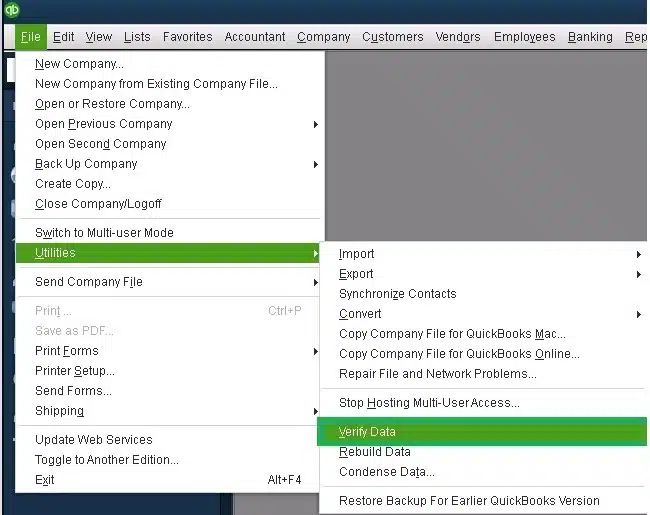
- Go to the File menu.
- Tap on Utilities.
- Select the Verify Data.

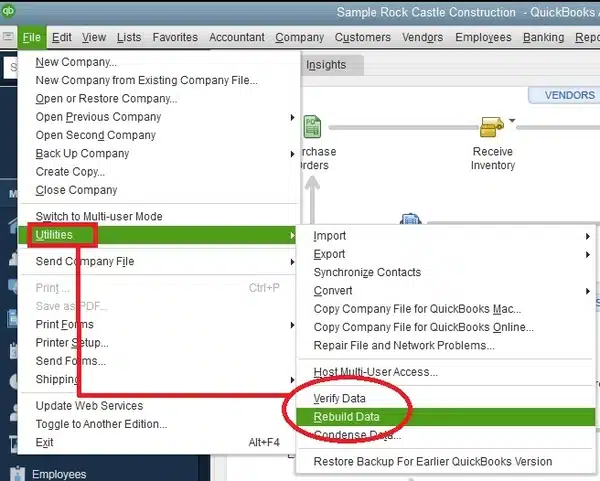
- Now, tap on the File menu.
- Go to the Utilities section.
- Then, click on the Rebuild Data option.

- If asked, QuickBooks asks for a backup, then creates a backup.
- Click on OK.
- Choose the location where you wish to save the backup file.
- Enter the file name and tap on OK.
- Once completed, you will be prompted with “Rebuild has completed.”
- Tap on OK.
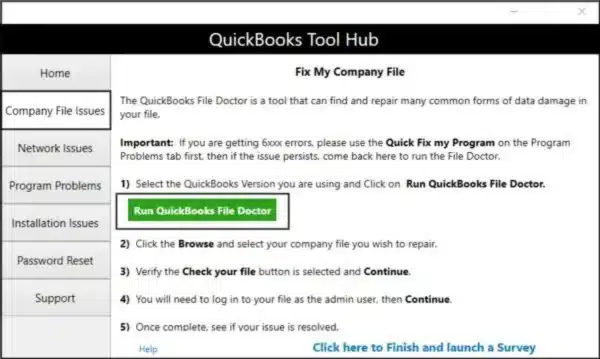
- To use the file doctor, download and install the QuickBooks Tool Hub.
- Launch the Tool Hub.
- Then go to the Company File issues tab.

- Tap on the QuickBooks file doctor and let the tool run and fix the issue.
- Try restoring the recent backup of the company file.
- You can also try to create and launch a new company file.
- The transactions that will not be affected when you condense the company file are as follows:
| Transaction | Description/Reason |
| Payroll transactions | If you condense the data before 12/31/2018, or if you haven’t reviewed an employee’s W-2. |
| Invoices, payments, credit memos, and refund checks | If you haven’t linked these transactions properly with each other. |
| Payments recorded to Undeposited Funds | If these transactions are not deposited into a bank account. |
| Bills, bill credits, and bill payment checks | If you haven’t linked these transactions properly with each other. |
| Estimates linked to invoices | Journal entries are posting transactions, whereas Estimates are non-posting entries, and thus, they can’t be condensed into journal entries. |
| Sales tax not paid in Pay Sales Tax | If you have used checks to pay your sales tax, the invoices will remain open and will not be consolidated. |
| Transactions linked to a non-condensable transaction | Example: You entered an invoice on 12/16/2020 and the corresponding payment on 1/16/2021, then tried condensing the data file through 12/17/2020. You cannot condense both. This happens as the invoice is linked to a payment that falls outside the period. |
The factors that can be affected by condensing the data file are as follows:
- The account-based and item-based reports include the profit and loss statement, balance sheet, statement of cash flows, and trial balance. However, the item-based reports will be blank because the QuickBooks Condense Data utility deletes item data. These reports include sales and purchase reports, job costing reports, and A/R and A/P reports.
- The cash-based reports will be inaccurate for the condensed period. Additionally, the links from cash to income or from cash to expenses cannot be found.
- When using the Condense Data Utility, classes are not assigned, and a profit and loss by class report will display the results unclassified.
- The sales tax and invoices will be nonexistent. The tax collected is also recorded in invoices and shows a value of zero.
- The data and reports are derived from the items on invoices and bills.
- When using the tool, it removes transactions from the company file and the Audit Trail report. If there are edited, voided, or deleted transactions in the company file, then the condense audit trail info option is present for help.
- As the condensed journal entries are cleared transactions, the opening balance for the reconciliation will be accurate.
- The latest reconciliation might be lost, and the statement date might not be correct.
These are the crucial factors to understand when using the QuickBooks Condense Data utility in your system.
How to Use the QuickBooks Condense Data Utility: Detailed Steps
Ensure you backup the company file before using the data utility in your QBDT application. There are two methods to condense your company file while preserving transactions.
Method 1: Condense Data and Keep the Transactions
Perform the steps below to use the utility without losing your transactions.
- Exit all QuickBooks windows.
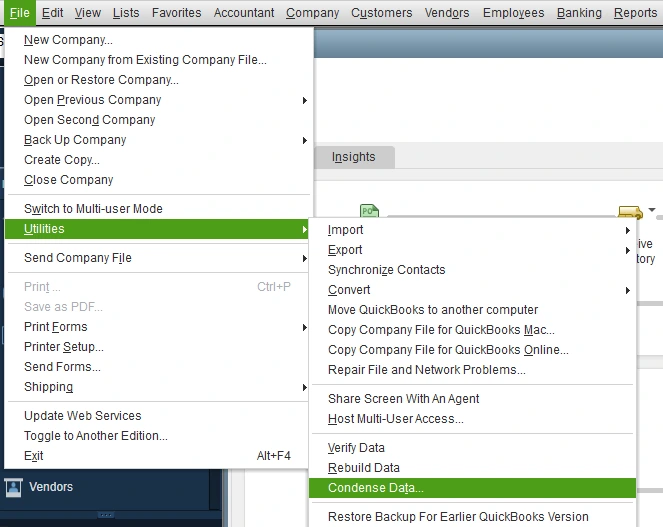
- Tap on the File tab.
- Select Utilities, then Condense Data.

- Choose to keep all transactions, but remove audit trail info to date.
- Click on Next.
- Finally, tap on Close.
Method 2: Condense Data and Remove Selected Transactions
When you wish to remove the selected transactions in your system, here are the steps to follow.
- Go to the File menu.
- Then head to the Utilities tab and select the Condense Data option.
- Now, tap on the Remove the transactions you select from your company file.
- Tap on Next.
- Select the transactions you wish to remove and then press Next.
- Choose how you want the transactions to be summarized.
- Again, hit Next.
- Select how the inventory should be condensed and press Next.
- Choose the transactions that you wish to remove and click on Next.
- Select the list of entries you wish to remove.
- Click on Next.
- Now, tap on the Begin Condense option.
Let the process run and complete all operations, then select Close.
Fixing Error When Using the QuickBooks Condense Data Utility Tool
Before we start talking about the methods to troubleshoot, let’s first have a look at the situations you might get stuck with when you use the Condense utility tool in your QBDT.
- The server transaction will get stuck and will fail to deposit funds.
- The process of condensing data might freeze, which makes the process stop in the middle.
- You will be unable to deposit the transactions as funds when condensing the company file in QB.
Now, let’s look at the troubleshooting methods for the errors when you use the Condense Data Utility tool.
Solution 1: Restore a Backup Company File
The QuickBooks application uses the backup company file (.qbb) to create a new company file (.qbw) when you restore the backup.
- Access the QuickBooks application.
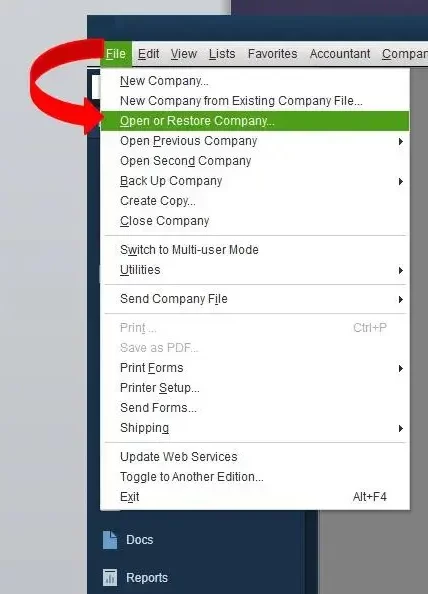
- Head to the File menu.
- Click on the Open or Restore Company option.

- Tap on the Restore a backup copy option.
- Then, click on Next.
- Tap on the Local Backup option and again press Next.
- Locate the backup company file in your browser; it will be carrying the .qbb extension.
- Choose a folder where you wish to save the restored version of the company file.
Once done, choose Save and restart your application to apply the changes that you have made.
Solution 2: Make a New Company File
The step-by-step guide below will help you create a company file.
- Access the QuickBooks Desktop application.
- Head to the No Company Open window.
- Click Create a new company.
- Now, you will get two setup options:
- Tap on Express Start or Start Setup to start. You need to enter your business name, industry, and business type, then select the Create Company File option to create the company file.
- When you want to perform a complete setup with all your information from the beginning, choose Detailed Start.
- Now, follow the onscreen steps to finish the process.
- Click on Start Working.
These steps will help you resolve the errors you encounter when using the QuickBooks Condense Data Utility.
How to Condense Your QuickBooks Desktop for macOS Company File?
When you are using a macOS device and wish to compress the company file size, you must know how to use the Condense Data utility tool in QuickBooks Desktop. Here are the steps you need to condense the file for your mac.
Remove the Audit Trail
- Access the QuickBooks application.
- Go to the File menu.
- Tap on Utilities.
- Then, press the Condense Data option.
- Now, select the Remove Audit Trail info to date option.
- Tap on Condense.
- Now, save a backup of the file.
- Verify the information displayed on the screen for Condense Data Completed.
Delete all Transactions
- Go to the File option.
- Now, tap on the Utilities menu.
- Click on the Condense Data option.
- Select the Remove All Transactions option and ensure to keep Preferences and Lists.
- Tap on the Condense option.
- Now, save the file as a backup.
- Check the information shown on the condensed data completed screen.
Delete Transactions Dated
- Go to the Files menu.
- Then, tap on the Utilities option.
- Click on the Condense Data option.
- Tap on the Remove Transactions dated.
- Now, select the Before option and choose a date.
- Select More Options to choose the options you need.
- Create a backup of the file.
- Look for the information shown on the Condense Data Completed screen.
The steps above will help you to use the QuickBooks Condense Data Utility in your system when you are using a macOS.
Conclusion
In this blog, we have helped you understand the QuickBooks Condense Data Utility tool. Furthermore, we have outlined methods to help you use the tool on both Windows and macOS. Additionally, we have outlined the troubleshooting steps to use when you encounter errors with this tool. If you need any help to create or backup the company file, feel free to contact our experts.
Frequently Asked Questions (FAQs)
Can I undo the changes once done by the QuickBooks data utility tool?
No, it is not possible to revert the changes once done by the condense data utility tool, as it is irreversible. Ensure you always have a backup of the company file so you can restore to an earlier version when needed.
Which type of reports can be affected by the condensed period only?
There can be a different list of reports that can be affected due to the condensed period, which are mentioned below:
– Reports such as Purchase, A/R, Sales, Job Costing, A/P Aging, etc.
– Reports filtered by class.
– Sales tax liability report.
– The receivables collection reports.
– Purchase and Sales detailed reports.
– Reports like Balance Sheet, Profit and Loss, Trial Balance, Cash Flow, etc.
– All cash basis outgoing and incoming reports.
– The audit trail report.
– Reconciliation reports.
What is the size limit to use the condensed QuickBooks company file?
When the company file size exceeds 1GB, it is recommended to compact it to reduce its size. If your company file is exactly the same size, there is no need to minimise its size.

Erica Watson is writing about accounting and bookkeeping for over 7+ years, making even the difficult technical topics easy to understand. She is skilled at creating content about popular accounting and tax softwares such as QuickBooks, Sage, Xero, Quicken, etc. Erica’s knowledge of such softwares allows her to create articles and guides that are both informative and easy to follow. Her writing builds trust with readers, thanks to her ability to explain things clearly while showing a real understanding of the industry.