QuickBooks error 1601 is a common occurrence among QB users while updating or installing the software application. It can happen for many reasons, including problems with an installer or program, among others. This error code can affect your QuickBooks experience and prevent you from installing, updating, and operating the application. In this blog, we will discuss how to eliminate this error code with the help of some effective solutions.
This blog is a definitive guide that will help you fix the 1601 error code in QuickBooks. However, if you are unwilling to self-resolve the error or need a faster resolution avenue, call our Proadvisor solutions support experts at 1.855.888.3080 to get the best guidance.
Table of Contents
List of Main Triggers for QuickBooks Installation Error 1601
Knowing why this error code appears is imperative before performing the troubleshooting process for better clarity and understanding. Below, we have mentioned a list of underlying causes that might make your application prone to QuickBooks error code 1601 –
- The Windows Installer service is malfunctioning or might be inactive on your PC.
- If the Windows Installer service is incorrectly registered, it can also lead to the 1601 error.
- Some necessary components to run Microsoft applications, such as the .NET framework and the MSXML component, might be corrupted or dysfunctional.
- Your Windows OS version might be old or outdated, which can cause incompatibility while installing or updating QB.
- Your QBDT installation process might be faulty or incomplete, and the installation files might be corrupted.
These are the possible reasons why QuickBooks error message 1601 is appearing on your screen. Now, let’s learn about the troubleshooting solutions to resolve this update/installation error in the next section.
Practical Solutions to Quickly Dismiss QuickBooks Update Error 1601
Once you have understood the underlying causes for this error, you should follow the effective solutions given below to address it with ease –
Solution 1: Use the QuickBooks Install Diagnostic Utility
Since one of the leading reasons behind the 1601 error code is issues with the application’s installation, you must run a diagnosis. You can scan QuickBooks Desktop for installation problems by running the QuickBooks Install Diagnostic Tool using the following instructions –
- Start by downloading the most recent QuickBooks Tool Hub version (1.6.0.5) on your PC, then install it using the onscreen steps.
- Launch the QB Tool Hub, move to the Installation Issues section, and click the QuickBooks Install Diagnostic tool.
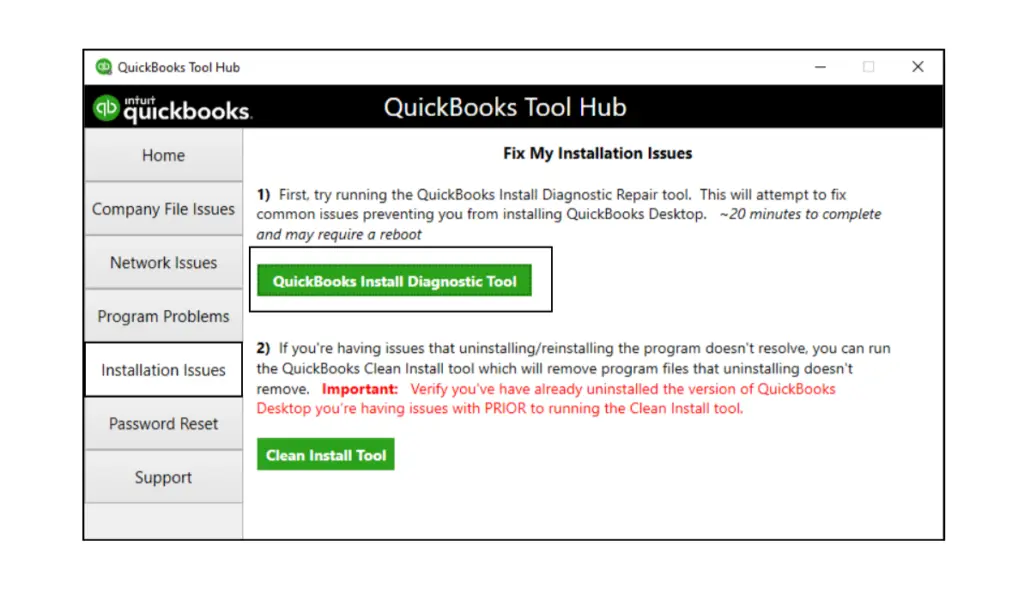
- This utility might take around 20 minutes to run, and when the process is complete, restart your PC and rerun QuickBooks Desktop.
Now, open the data file and then go for the updating of the software program to find whether error 1601 in QuickBooks Desktop has been sorted out or not? If not, read the guidelines under Solution 2 below to effectively solve this installation error.
Solution 2: Manually Fix the Microsoft .NET Framework
In the event that the Microsoft .NET Framework is wholly or partially corrupted, they will be unable to install QuickBooks Desktop. An impaired framework results in common QBDT installation errors, like QuickBooks Error 1601. In order to rectify this error, you must manually repair the .NET Framework by following the following steps –
Step 1 – Find the Microsoft .NET Framework
First of all, you need to find the .NET Framework on the list by following the steps below –
Note: Follow the same steps to repair the .NET Framework 4.5, 4.6, 4.7, and 4.8, and the steps given below apply only to Windows 10 or later version users.
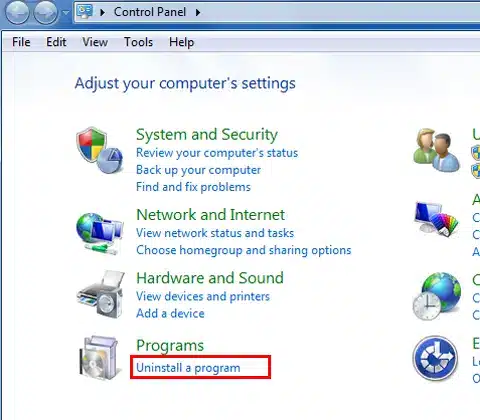
- Firstly, exit all the open programs, then access the Windows Start menu and type “Control Panel” in the search box.
- Access the Control Panel, navigate to the Programs or Features section, and then select Uninstall a Program.
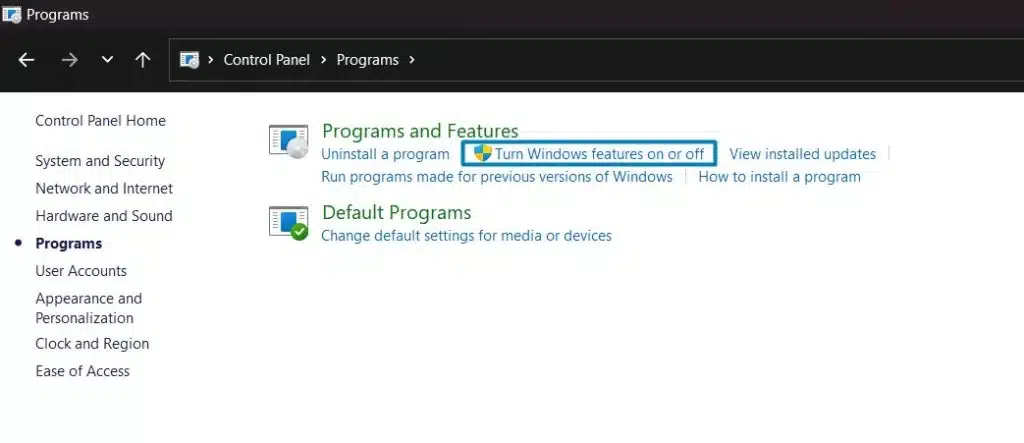
- Finally, click on the option that says Turn Windows Features On or Off, and there, you will see Microsoft.NET Framework.
Step 2 – Check the .NET Framework 4.5 (or Later) Settings
The next step to fix QuickBooks error 1601 in Windows 10 is to review the framework settings, then perform the following steps based on whether the checkbox is selected or not –
If the Microsoft .NET Framework 4.5 Version (or Later) Checkbox isn’t Selected –
In case the Microsoft .NET Framework 4.5 (or later) checkbox is not marked, use the following instructions –
- Click the checkbox to turn on or enable .NET Framework 4.5 (or later), then click OK to save the modifications and restart your PC.
If the Microsoft .NET Framework 4.5 Version (or Later) Checkbox is Marked –
If the .NET Framework 4.5 (or later) checkbox is selected beforehand, go through the following detailed steps –
- Firstly, mark the checkbox to disable the .NET Framework 4.5 (or later) option, and ensure that you do not turn it back on.
- Further, select OK to save the changes, restart your PC, and sign in again.
- Lastly, when you’re signed back into your Windows version, mark the checkbox to turn on the .NET Framework 4.5 option again.
After undertaking these steps, follow the next step to review the settings for .NET Framework 3.5 SPI.
Step 3 – Review the .NET Framework 3.5 SPI Settings
Go through the steps below based on whether the .NET Framework 3.5 SPI checkbox is marked or unmarked –
If the Microsoft .NET Framework 3.5 SPI Checkbox is Unchecked –
Perform the following step if the checkbox for .NET Framework 3.5 SPI is not marked yet –
- Select the checkbox to enable or activate .NET Framework 3.5 SP1, click OK to save the edits/changes, and restart the computer.
If the Microsoft .NET Framework 3.5 SPI Checkbox is Marked Beforehand –
If the checkbox is already marked for .NET Framework 3.5 SPI, use the following instructions –
- Start by marking the checkbox to turn off .NET Framework 3.5 SP1, select OK, and don’t switch it back on.
- Next, restart your computer, log back into your Windows OS, and checkmark the checkbox to enable .NET Framework 3.5 SPI.
Note: It is recommended to consult your IT professional for guidance if you can’t toggle the framework.
After repairing the Microsoft .NET framework, try installing/updating QuickBooks Desktop again. If you still encounter the QB installation error code 1601, use the solution to remove it.
Solution 3: Repair QuickBooks using Control Panel
An improper installation of QB is required to be repaired in order to fix the 1601 error code reliably. You can run a QBDT repair by accessing the Control Panel from the Start menu in the following manner –
- Open the Control Panel and select the Programs and Features or Uninstall a Program option.
- Select QuickBooks Desktop, click the Uninstall/Change option, and hit Repair.
- Further, follow the on-screen instructions to finish the repair process and restart your PC.
If you encounter QuickBooks error 1601 even after repairing the application, move to the next solution and install QB again.
Solution 4: Clean Install QB
Installation issues in QB leading to the 1601 error can be addressed by using a freshly installed version. You must remove the current QuickBooks version and install a new version using the Clean Install tool.
Once you have perfected the process of installing a new version on QB, the last thing that you need to do is activate the program In the following manner –
- Kindly pull down the QuickBooks program, then click Help, and then click on Activate QuickBooks Desktop.
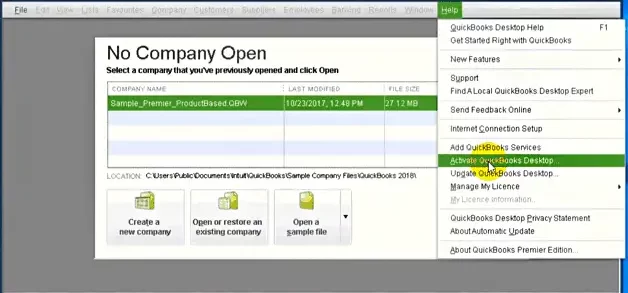
- Now, as you see on the screen, repeat your information and proceed with the QBDT activation steps.
If the 1601 error keeps occurring even after reinstalling the program, proceed to Solution 5 below.
Solution 5: Fix the Microsoft MSXML Component
Due to a corrupted or damaged Microsoft MSXML, QB Desktop users may face difficulties in installing or updating it, leading to QuickBooks error 1601 in Windows 11. To repair the damaged component, you must re-register the MSXML DLL files by using the following instructions –
64-bit Windows Operating System
You can register the MSXML files on a 64-bit operating system by going through the steps below –
- Access the Windows Start menu, type “cmd” in the search bar, and right-click cmd to run the command.
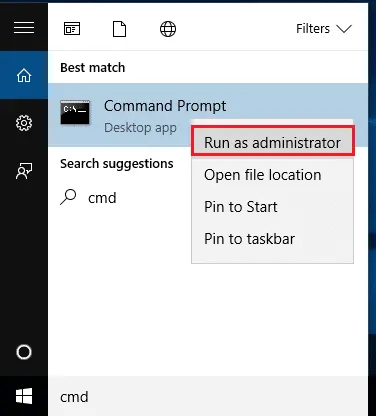
- Next, click the Run as Administrator option, go to the C: prompt, and input “cd\windows\syswow64.”
- Finally, type “regsvr32 MSXML6.dll,” hit Enter, and try installing QB Desktop again.
32-bit Windows Operating System
If you use a 32-bit OS, the steps mentioned below will help you register the Windows MSXML files –
- Use the Windows + R keys to access the Run window, then input “cmd” in the command box and click Enter.
- Next, type “regsvr32 MSXML6.dll,” select Enter, and install QuickBooks Desktop again once the MSXML files are registered.
Now, ensure you can install QuickBooks without the 1601 error; otherwise, move to the next solution.
Solution 6: Update the Windows OS Version
An outdated operating system can cause compatibility issues while installing or updating QB Desktop, which can lead to installation/update errors. Thus, you must ensure your Windows OS is updated to the latest release by using the instructions below –
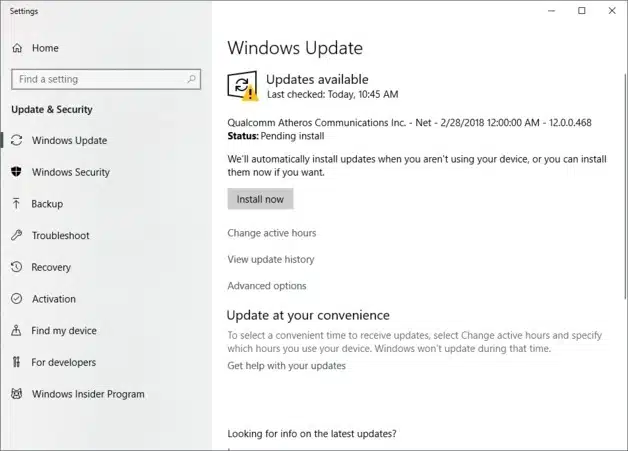
- Open the Windows Start menu, then move to the Settings menu and click the Update & Security option.
- Next, select Windows Update, hit the Check for Updates option, and if updates are available, install them.
If QuickBooks error 1601 still persists and bothers you even after updating the Windows OS, perform the steps in the next solution to work on removing the error code.
Solution 7: Ensure the Windows Installer is Enabled
If the Windows Installer service is not active on your PC, installation, and update issues in QB are bound to occur. Thus, you can fix the 1601 error code by enabling the Windows Installer in the following manner –
- Open the Windows search box, type the “Services.msc” command, and choose the Services app.
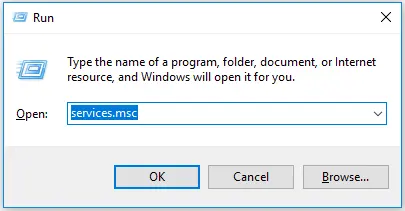
- Next, you should find Windows Installer in the list of services, right-click on the service line, and select Properties.
- Pick Manual as the Startup Type option, then hit Start and click OK to activate the Windows Installer service.
Once the Windows installer is running correctly, rerun QuickBooks and check if the installation and update issues have been rectified. If QuickBooks installation error 1601 persists, move to troubleshooting solution eight below to eliminate it.
Solution 8: Register the Windows Installer Program Again
If enabling the Windows Installer doesn’t help address the error, try registering the program by running the following command –
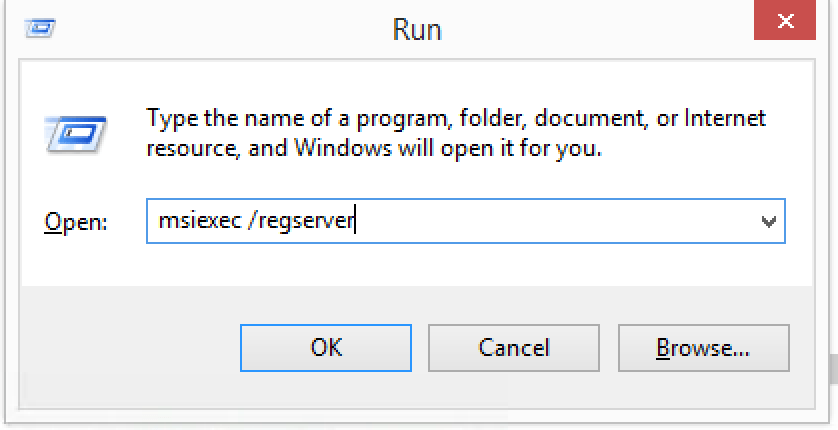
- Access the Run window by using the Windows + R keys, then enter “msiexec.exe/unreg” in the command box and hit Enter.
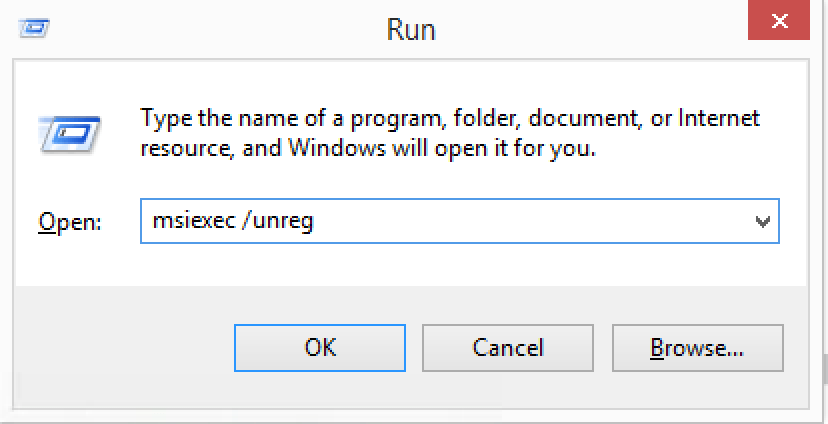
- Further, return to the Run window, and type “msiexec/regserver” to re-register the program, then select Enter.
After the Windows Installer is re-registered, rerun QuickBooks to ensure the 1601 error code is finally dismissed.
Conclusion
You can follow the solutions provided in this troubleshooting guide to resolve QuickBooks error 1601 with ease. But in case all these solutions do not help to eliminate the error or else in case you experience some problems in the process, then it is possible to address to other specialists. For professional assistance in quickly fixing this update error, please call our Proadvisor solutions specialists at 1.855.888.3080.
Commonly Asked Questions
What are the tips to prevent QuickBooks error 1601 from occurring in the future?
To ensure you don’t encounter QB installation error 1601 in the future, you must keep your Windows OS updated. Also, ensure you have the latest Microsoft Windows Installer version on your computer. It is also essential that your anti-virus app settings are correct and they don’t block the QuickBooks installation and update process.
Can the QB Tool Hub utilities help fix the 1601 error code in the application?
Since this particular error code occurs due to installation problems in QBDT, you can use the Quick Fix My Program tool of the QB Tool Hub to run a program repair process and remove the error code.
How can I fix the issues if the Windows Installer service is not running?
If you face issues despite re-registering and enabling the Windows Installer service, you can try installing it again. Download the recommended Windows Installer version from the Microsoft Store and follow the onscreen prompts to install it.

Erica Watson is writing about accounting and bookkeeping for over 7+ years, making even the difficult technical topics easy to understand. She is skilled at creating content about popular accounting and tax softwares such as QuickBooks, Sage, Xero, Quicken, etc. Erica’s knowledge of such softwares allows her to create articles and guides that are both informative and easy to follow. Her writing builds trust with readers, thanks to her ability to explain things clearly while showing a real understanding of the industry.